The Canvas
The canvas is the heart of Maestri — an infinite 2D space where you arrange your terminals, notes, file trees, and other nodes however feels natural to you. There's no right or wrong layout; the canvas adjusts to your thinking, not the other way around.
Inserting nodes
Select a tool from the top toolbar, then click and drag on the canvas to draw a rectangle. The node appears at the size and position you drew.
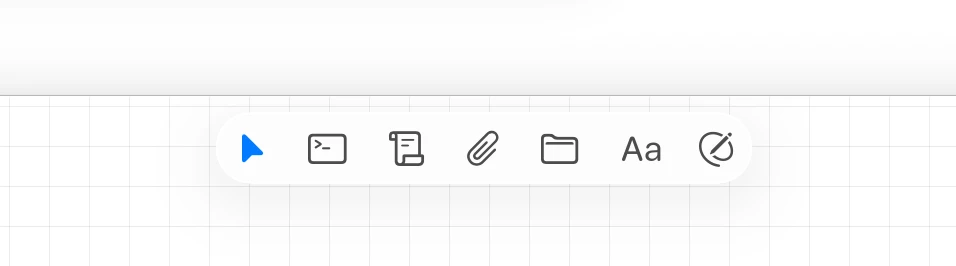
Available node types: Terminal, Note, Text, Drawing, and File Tree.
The default size of new terminals and new notes is configurable in Settings → General. Values snap to the 20pt canvas grid, so whatever you set still aligns cleanly with magnetic snapping and groups.
Moving and resizing
- Move — Click and drag from an empty area inside the node (usually the header area at the top).
- Resize — Position the cursor on a corner or edge and drag to the desired size.
Node actions
- Duplicate — Hold Alt while dragging, or right-click → Duplicate
- Delete — Ctrl W, or right-click → Delete
- Focus in viewport — Ctrl\ while the node is selected
- Zoom to selection — Select one or more nodes and press CtrlAlt\, or choose View → Zoom to Selection, to fit the selection in view.
- Blur — Right-click → Blur hides a terminal's or a note's contents behind a faint eye, while its header, name, and chrome stay put. Click the eye, or right-click → Remove Blur, to bring it back. It applies to the whole selection at once, which is what you want before a screen share or a screenshot.
Lift and dock
Double-click a node's header to lift it into a centered panel, clear of everything else on the canvas. Terminals, notes, portals, and file trees all lift, and a file tree opens into a wide split when its editor pane is showing. Double-click again to send it back to its place.
Drag a lifted panel to a screen edge and it docks there as a full-height column, staying put while the canvas pans and zooms underneath. That keeps one agent in view while you work somewhere else on the board.
Resizing a lifted panel steps with the canvas grid, and snaps back when it nears the default size.
Lift ships with no keyboard shortcut so it can't shadow one you already use. Bind Lift element in Settings → Shortcuts if you'd rather not double-click.
Canvas navigation
Maestri's canvas navigation follows the conventions of design tools like Figma, so it should feel immediately familiar.
Trackpad
- Pan — Two-finger swipe in any direction
- Zoom — Pinch in or out
Mouse
- Pan — Click and hold the scroll wheel, then drag
- Pan + zoom simultaneously — Hold scroll wheel and scroll
- Zoom — Hold Alt and scroll
- Pan (alternative) — Hold Space and click-drag
Keyboard
- Zoom in / out — Ctrl+ / Ctrl-
- Step along a connection — CtrlAlt→ / CtrlAlt← walks to the next or previous node connected to your current selection. Works across terminals, notes, portals, and across floors — the order is deterministic so the same key always lands you on the same neighbor.
- Jump to the next agent that needs attention — Ctrl⇧A cycles through every terminal showing a red attention dot, across the ground floor and every floor.
- Toggle the minimap — Ctrl⇧M opens or closes the minimap popover from anywhere.
Zoom controls and mini map
Zoom controls are available in the bottom-right corner of the app. Next to them is a mini map that shows your current position on the canvas — useful when your workspace has grown large and you've lost track of where things are. The minimap popover can also be toggled from anywhere with Ctrl⇧M.
Node groups
When two or more nodes belong together — a Maestro and its recruits, a builder paired with its review note, a portal and the agent driving it — you can bind them into a group. Groups give those nodes a shared, labeled frame so the relationship is visible at a glance, and let you move the whole set in one motion.
- Group — Select two or more nodes and press CtrlG. A frame appears around them with a header you can drag.
- Ungroup — Select the group (or any of its members) and press Ctrl⇧G.
- Rename — Double-click the group header.
- Move together — Drag the header to move every member at once. Members that are individually locked stay put.
Groups behave like a label, not a wall: marquee selection and clicks still pass through the frame to whatever is inside, so they never get in the way of normal canvas work. Copy/paste, Alt-drag duplication, workspace export/import, cross-workspace clone, and undo/redo all preserve group membership — including connections between members.
Note
Groups need at least two members. If you delete enough members that only one is left, Maestri dissolves the group automatically so you never end up with empty frames.
Align and distribute
When two or more nodes are selected, Maestri can align or distribute them for you. Right-click the selection, or go to View → Align:
- Align Left — line up the left edges
- Center Horizontally — center on the horizontal axis
- Align Right — line up the right edges
- Align Top — line up the top edges
- Center Vertically — center on the vertical axis
- Align Bottom — line up the bottom edges
- Distribute Horizontally — equal horizontal spacing between nodes
- Distribute Vertically — equal vertical spacing between nodes
Tidy
Select two or more nodes and choose View > Tidy (or press ⇧CtrlT) to let Maestri arrange the selection into a perfectly aligned grid for you. It's the quickest way to clean up a messy cluster without dragging each node by hand.
Magnetic tile snapping
Hold Ctrl while dragging a node and it snaps into mosaic-style layouts, automatically matching walls and filling gaps for a clean, tiled workspace.
- Wall matching — Nodes align to the nearest edge of adjacent nodes.
- Gap filling — Drag a node into an empty space between others and it positions itself to fill the gap cleanly.
- Grid-free — Snapping adapts to your actual layout instead of locking you into fixed sizes.
Release Ctrl at any time to return to free-form dragging.
Tip
When a node is selected, a dashed border appears around it to indicate the active selection. Click an empty area of the canvas to deselect.