Maestro Mode
Maestro Mode promotes a terminal from a regular agent into a manager — one that can recruit new agents to your canvas, assign them roles, wire them into the right notes, and dismiss them when their work is done.
It turns a single lead agent into the entry point of an entire team, assembled on demand.
Enabling Maestro
Maestro is a per-terminal setting. To enable it:
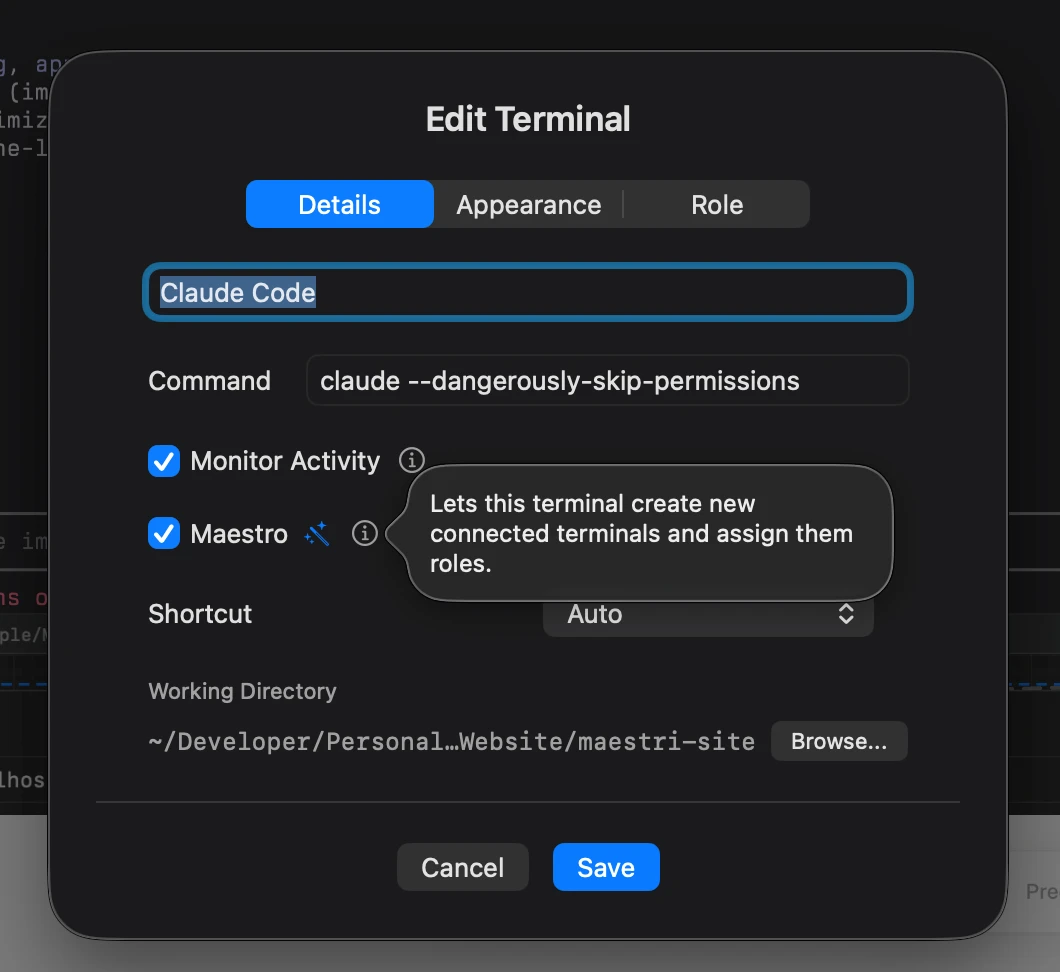
- Open the terminal creation sheet (or right-click an existing terminal → Edit Terminal).
- Tick the Maestro checkbox in the Details tab.
- Save.
Once enabled, the agent inside the terminal gains access to the manager skill, which exposes commands for managing its own team.
What a Maestro can do
A Maestro can act on the canvas the way you would, but through the agent itself:
- Recruit — Spawn a new connected terminal below itself, with whatever agent and role makes sense for the task.
- Connect — Wire a new recruit to any of the Maestro's existing connected notes, so they share the same source of truth.
- Reassign roles & tweak prompts — Swap a recruit's role on the fly, or edit the role's instructions directly. The canvas position, name, and connections are preserved — only the agent process restarts with the new instructions.
- Dismiss — Close a recruit's terminal once its work is done, keeping the canvas tidy.
You drive all of this through plain prompts to the Maestro, like:
"Assemble a small software factory: a Builder to ship the feature, a Reviewer to catch regressions, a Tester to write coverage, and a Doc Writer to update the changelog. Connect all of them to the spec note, then dismiss each one as it finishes."
Note
A Maestro can create, edit, and reassign roles, but it cannot delete them. To remove a role from your library, head to Settings → Agents.
Picking the agent
A Maestro can see the same agent presets you see in the terminal modal — every coding agent you've configured in Settings → Agents is available to it.
By default, a Maestro tends to recruit copies of itself: a Claude Code Maestro will spawn more Claude Code recruits, a Codex Maestro will spawn more Codex recruits, and so on. This is usually what you want — one familiar toolchain across the team.
But you can override that whenever it matters. Just tell the Maestro which agent should fill which role:
"Assemble a team where Codex is the reviewer, Claude is the builder, and OpenCode is the writer."
The Maestro will recruit each one with the matching agent preset and role. Mixed-agent teams are useful when you want to play the strengths of each tool against each other — for example, one agent's review catching what another agent's implementation missed.
Layout
Recruits are automatically placed evenly below the Maestro that spawned them. You don't need to position them by hand — the Maestro handles spacing so the team stays readable as it grows.
You can still move recruits manually like any other terminal; the auto-layout only runs at recruit time.
Sharing context through notes
Any note already connected to the Maestro can be wired into specific recruits — and into other notes too, building a chain. This isn't automatic; the Maestro creates these connections deliberately, just like you would on the canvas.
That's how you build a team that shares the same source of truth: write the brief once into a note connected to the Maestro, then ask the Maestro to connect that note to whichever recruits need it.
Recruits read and edit those notes the same way any connected agent does — see Notes and Connections.
Recruits know who they are
Inside a recruit, maestri list shows the recruit's own name and role alongside its connections, so the agent always knows what hat it's wearing and which teammates it can reach.
Tip
Pair Maestro Mode with well-defined roles in Settings → Agents. The clearer your roles, the easier it is to ask a Maestro to "recruit a Tester" or "recruit a Reviewer" and get exactly what you expect.